
I used the fused deposition modeler to create high quality accurately finished products. Once I had composed all of my drawings using Pro/ENGINEER I converted all the files of my parts into STL files. These were then uploaded on another programme and sent to print using the 3D printer. This process is quite simple one you have constructed your CAD parts but it is quite costly and time consuming. My first 6 parts took around 10 hours so that gives you an idea of how long a product even at this size would take to manufacture.

Here is an image to show my finished parts that were 3D printed. They are very high quality and accurate. I was very pleased with the results after a long wait. There is a huge sigh of relief when you put your parts together for the first time.


Although the finish doesn't look too bad on the products if you look close up you can see all of the layers that are built up to create your 3D model. I photographed all of my pieces individually so that you could see clearly the details of each part.


Once I had all my parts and fitted them together I found that some were quite tight when fitting together so I had to sand all of the exteriors to ensure the fittings weren't too tight so that you could access the internal model at a later date to change the battery etc. I used a fine wet and dry sand paper including a very fine sandpaper to gently removed away material. I did find that some of the pieces had tiny imperfections and needed more care and attention.


Once all of the parts were sanded I was quite pleased with the results. Each set of components slotted easily together and looked as though they related strongly to the theme of Tron.


I did decide however to spray the parts as they were shown in my design sketches to be both blue and white, this meant an extensive preparation process to ensure the surfaces of each part was prepared.


Each part received a bath to get rid of any fine dust or particles that were on the surface. Each was then dried and received a thin coating of filler. This was then left to set for a few hours and then sanded off.


Once this process was complete each of the parts received another bath to remove any dirt and particles from the surface, they were once again left to dry so they were ready to be sprayed.


Each part then received a coat of primer, sprayed from around 30cm away in a well ventilated area. This part was quite time consuming and very nerve racking as your product is being transformed.


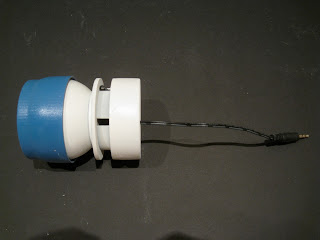
Once the primer was dry, each part received either a blue or white coat, this was built up in layers over several hours, the white needing more layers than the blue.


Once the paint had dried i began assembling my parts, it was then I had found that the layers of spray had made some of my pieces quite a tight fit again, I couldn't however sand again at this stage because it would have ruined the finish of the paint so I had to fit my parts together the best I could. Even though the parts are all together apart from one of the back pieces I left out to make it easier perhaps at a later date to rectify the situation and change the battery etc, i don't think i like the finish as much as the unpainted look. The product does work and plays a good sound but the paint has ruined the beauty of my product because for me it was more about how the design worked rather than the finish. If I was to choose again I would have kept it free from spray as I felt it was more a piece you could learn from before, now it's just another promotional speaker that will sit on a shelf.


Even though the manufacturing process is quite simple it still has the same fundamentals of all the other CAM equipment when creating a product. I have learnt a great deal from the manufacture of my product including when and where you shouldn't change things.
For now the finished promotional item:


